Showing posts with label DIY. Show all posts

November 3, 2013

ABOUT PRIVACY: Part I: Making a Basic Bedroom More - a Suite of Spaces


Melissa has the smallest bedroom in our home, 11 x 15 feet. Not bad actually. Still it's just a basic rectangle-shaped bedroom. But as you'll see, it can be made into something more. 
(Click on any of the pictures for a larger view.)

It has lovely northern and western light. Melissa's moved her bed to the outer corner of the room so it's framed by the two large 4-foot-wide windows, and is farthest from the bathroom she shares with Stephen. They tend to use the bathroom about the same time in the mornings, so it doesn't disturb her sleep, but she likes the outer space for her bed.

She prefers a removed feel for her work area, so I suggested she place her desk  in the corner where it's also flooded diagonally by natural light, which happens to be northern light. The best. 

Below and in the plan, you see that the wall her door opens onto also leads to her closet and its door, so major furniture tends to be placed on the window side, making the room feel overly-weighted on the far end. But as is, if her door is ajar, you can see directly into her room from anywhere on the landing. So most people using this room will do exactly that. There's no sense of privacy if she wants her door open, which in our house is an invitation to say hello.

Essentially, you can add privacy to a box of a bedroom like this by creating an entry into the room. There are several ways to do this, and you get a bonus when you do - more activity niches for yourself!

You can create these spaces as easy temporary DIY additions which you'll see here. I'll talk about more permanent options in Part II.

THE TEMPORARY, EASY FIX

The simplest, most flexible fix can be done in any room (rented or owned) by creating an entry alcove with something vertical that acts as a visual divider. Be as creative as fits your soul! I'll work the principle here with a shelf-unit, but you could use ceiling-hung fabric, an art panel, a textural wood piece, or anything that appeals. I like shelves or cabinets because they offer additional storage.  So here's what happens if you use one 6-foot shelf:

Placing just one tall shelf facing the entrance just inches beyond the entry door's full open swing creates a new path of entry that requires a turn before they see into your room. (Also notice that since this is earthquake country, I have anchored the end of the shelf to the wall with a piano hinge. This secures the shelf, but allows it to be easily rotated against the wall for moving larger furnishings in and out.)


Interestingly enough, an open-backed shelving or a divider works just as well; either draws the eye as someone approaches, so the onlooker's vision is foreshortened. It depends on how private a feel you need, and how much light you'd like passing through this "wall" you've created.

Now decide if you want the stuff on the shelves facing the entry as decor to intrigue, or facing the space you've created behind the unit. (You can hang a picture on the back for visitors to see as they pass or enter.) Maybe find or make a unit that has some of each?

Plus, you have this new niche behind the shelf. There's enough space for a small upholstered chair where you might read by all the natural light of that large window. Maybe with a tiny ottoman. You also have balanced the room's furnishing better as well. 

People will tend to walk into the room straight towards the desk unless they plan to sit on the bed. If you're reading my posts, you'll note right now there's "wasted square footage," that could be put to use along that wall. We placed Melissa's hot water kettle and tea set-up on a small, low carved table just behind her within easy reach, with her favorite books on a series of wall-mounted shelves above. It creates a vertical element that's very special to her, and it feels quite delicate and intimate. She likes her space spare, and only wants a picture on the wall. So for her, that space is where she kneels to prepare tea as she works, or stands to scan her treasured books.


Okay, if creating a sitting niche right by your closet isn't appealing, you can move the shelf or divider further back as you see in this second iteration, to allow the space for a second shelf perpendicular to the entry door. See what this does:


These units should be just high enough to cover what you want covered. You do not need to go high on both, and want light moving easy around these walls you create. So you might make one 6-foot tall, while another is 3 or 4-foot  high. 

You now have a protected entry. Hang some pictures along the left wall? Put a changing display on the shelf? A photo montage or collection you own? You are drawing your visitor deeper into the room before they turn to see where you are. While doing so, you get to choose what they see along the way. There's also a nice feeling of entry here and waiting to be invited in.

In addition, you have created a large alcove behind the perpendicular shelf. If it wasn't against the bathroom wall, you could put your bed against that low shelf using it as a headboard,or make it a seating nook with a comfy chair, or a creative task area. Music listening/making corner and collection? Up to you.

If you draw a plan of your room on graph paper to scale, you can play with the width of these two pieces to find more alcove variations. The shelves or dividers are creating circulation paths into your room. Directing these paths lets you add an activity area, and their heights and transparency lets you choose how much visibility you want that activity to have.

So if, for example, you're comfortable letting someone see over the perpendicular unit, keep it low. Try shortening it to about half the length that I show above. Doing so moves your "entry" more into the room's center allowing you to push the larger unit facing the door closer in. That allows you to fit a hamper right next to the closet, hidden from view.  As long as you leave 36 inches as your entry opening, it should flow nicely. Play.

And what you choose to use, and put on any shelves becomes another expression of you. Nice.




August 8, 2013

I have a Black Thumb, but a Green Hammer


The whole question of becoming more resilient always seems to start with growing our own food. With good reason, since without water and food, everything else is eventually moot.

But I am not a gardener. And no matter how many times I have tried, I have not learned to enjoy growing plants, or gotten any better at it.

I often believe in a natural division of labor. It certainly worked for my late wife Trish and I: I built her gardens, she grew stuff in them, I cooked the stuff, and together we ate it. (And evaluated my experimental recipes for disposing of the inevitable garden excess, such as the Twenty Pounds of Green Tomatoes Salsa.)


We were both seriously satisfied, and grateful to each other. I still can see Trish bent over in between her rows of plants, happy, involved and grounded in a way I never understood. I enjoyed helping her harvest, but she was nourished by all the parts of gardening.


(So much so that I got Trish her own chipper shredder for an anniversary present, and she was deeply pleased. Now she could make her own mulch!)


Well, I am not nourished by gardening. It actually drives me a little crazy. Which is why it will not be one of my contributions to resilience.

Oxalis

Because I have realized that I work best in a 1:1 ratio of physical work and result. When I lift up a big rock and carry it across the yard, I am happy that it stays put until I choose to move it again. When I cut a board and nail it to another board, I am truly pleased that they stay together, unless I screwed up and need to redo the joint. When I demolish a wall, I am so satisfied that the drywall and lathe and plaster stay in the debris bags and don’t climb back onto the walls overnight.


My experience of gardening is that crook neck squash that you spend weeks growing, that look so healthy and perfect for picking tomorrow, can become shriveled gray blobs by dawn. That when you (naturally) fertilize and feed your soil, oxalis invites itself to the feast, turning your garden green--but not in a fun way.  That your hours of weeding are rendered useless as soon as you water your garden again, given the regenerative capabilities of oxalis. And that basically, nature loves a stockpile, so the more you grow, the more bugs and slugs and invader plants and fungus and deer and not-so-cute-bunnies come to eat it and undo all your work.


Please believe me. I know we need to grow our own food, and that gardening is a challenging, essential task for resilience.


But it isn’t going to be my challenging, essential task.


***


So as part of this project, I will be blogging about my search for how my passions and skills can be as effective and useful as growing food.


Because I can’t be the only terminally non-gardening person concerned about self-reliance and resilience.


Right?


June 28, 2013

I am the Perfect Crash Test Dummy - Part 3


Moenkopi Hopi Wash and Lower Village, my home for two years.


For you to have an accurate picture of what this project feels like from the inside, I need to include my experiences of living powered down and more self-reliantly.


I spent two years living in a Hopi village that had no running water, no sewers, and no electricity. The old Mennonite mission buildings where we were housed had electricity and slowly running water, siphoned from the spring at the edge of the lower village and then stored in a water tank above the mission. (I used to say we had walking, not running, water.)  Heat was by woodstove. For my two years there, I split most of the wood, often with an old coughing chainsaw, but frequently by hand.


Living at the mission meant constant work on its systems, such as the roof, our water supply, our septic system and finishing out enough of the stone barn to house a thrift shop downstairs, and me upstairs. All the work was DIY, although sometimes a retired contractor and his sons came to work on our buildings as their way of supporting the unit. Until a brave entrepreneur built a mini-strip mall two miles away in Tuba City, the nearest useful hardware store was in Flagstaff. Flag was an hour-and-a-half drive when there were no sandstorms, thunderstorms, or blizzards. So if something was broken at the mission, we usually had to find a way to fix it with what was on hand.


Some people who came to the mission found this mode of living too challenging. But I loved it. I had no romantic visions of pioneer or rural life; I happen to relish the kind of mental and physical engagement this way of life requires.


For example, the mission was built into the rocky slope of the wash, and it was held in place by a series of terraces with high stone walls. We used to let lower village families garden in the terraces to help them grow extra food. But one night a village man went off drinking instead of turning off the crude irrigation system we had rigged for the gardens. We didn’t notice it running, because it was in the first terrace above the mission. But we certainly noticed a few nights later when fifty feet of stone retaining wall collapsed , just missing the main mission building.


Me, left, and an occasional helping hand.

I spent weeks rebuilding that wall using mud and the mound of rocks now conveniently close at hand. At first it was overwhelming—so many tumbled rocks, so much sandy earth spilling down from the terrace, and after one day of help from a friend, just me and a shovel and a wheelbarrow. And this on top of my regular daily work, too. 

Figuring out the most efficient process of rebuilding the wall started out as self-defense, but I came to really enjoy the problem solving challenge; how much water with how much earth makes the strongest mortar? The rocks that used to be at the base of the wall are now covered by all the higher rocks that fell onto them—how can I get at and use the heavy bottom rocks without moving every rock twice?


Living this way was certainly harder than using a contractor, or buying a pre-made solution. And there were many times when my reaction was more like, “Oh God, now what?” And I do remember the feeling of never being able to get ahead of anything. Because there was always something newly urgent that needed doing NOW, on top of my official job of running a daily rec center and rec program for the village kids, my unofficial jobs of co-hosting visiting travelers, grant writing, and helping run the weekly church activities.


But the truth is, I felt more alive. I’d spent my previous life in school,  reading and writing and studying, and playing music and working in commercial kitchens. So it was alternately daunting and exhilarating to have so much of my life now be in my own hands—if I could come up with a solution to a challenge with our buildings or with my work with the kids, I could just do it. And if I couldn’t, I’d better keep trying because there was usually no backup.


I’ve included as much self-reliance and simpler living as I could in my later life, from working on the houses I’ve owned—carpentry, roofing, electrical, and plumbing—to putting in gardens and even (God-forbid) gardening.


Now,  I don’t particularly want to have to split logs again, or build a fire an hour before I want the room to be warm.


But I do very much want to live more simply and robustly, so that I can directly engage whatever I need and make it work. This gives me a deep, deep satisfaction that I have never forgotten.


June 13, 2013

The Gift of the Group


I'm realizing that there's another layer of motivation to doing this project than just reaching for the companionship and energy that collective living offers me. Even beyond the delight of space designing my house. There's a layer under that, that is starting to bubble up to the surface. Because at last it can.

If I think about it honestly, sharing my home means having to do less. Less of the obligatory and the responsible, and more that is quite personal. And that's a healthy thing! It gives me time to find what must come from deep inside me and act upon it. How often do we have the time these days to do that?

Years ago, my beloved hubby and I tried doing it all ourselves. We did the tree-hugging, "back-to-the-land" lifestyle on10 acres in Washington. We were by ourselves because no other family lived in the state, and because my husband didn't trust strangers to hold true as a family would. We also had two young children. Even in our early 30's it was an huge task to create that from scratch on raw acreage. And, it became an overwhelming amount of work to maintain; ask anyone trying their own version of radical homemaking or urban homesteading. It is one of the reasons I do not have my husband anymore. We were trying to be supermom and dad and super global citizens all at once. 

I will also tell you that living all those values as just a nuclear family was very lonely at times. Everyone was a car ride away. Think about it. If you are trying not to get into that car until you have multiple errands and places to go, and if you are trying not to waste resources and conserve, then you do not hop into a vehicle every time you just ached to rub shoulders with a friend who is miles away. Nurturing yourself kinda settles to the bottom of barrel.  

So now, have those old priorities lost importance? Just the reverse. Those values are all the more dear to me, but I'm seeking another path to them now. One not so burdensome, or lonely, so I can achieve it.

Dunno if I'm wiser now that I'm older, but at least I've learned. I've learned that relying on someone else's muscles is okay. I've learned that reaping the benefit of their fascinations, inclinations, and strengths, enriches me. And now I am also realizing that their presence gives me breathing space.

And precious time. 

Time to relax, and exhale or walk to see a friend...just because. And even more to the point, living this way gives me time to explore all sorts of interests, some they've stimulated as well as my own. The time lets me delve into all those passions I discover I want to improve. To deepen. 

So if I look honestly at my own motivations, there's a real desire to use the collective as a gift for my own pursuits. But see then here's the thing: Being who I am, and still reaching for those values now means I get to focus on what skills I want to bring into the way I live. To train in skills that are important, and intensify my expertise. And that allows me to become more resilient, a deeper resilience that grows from the explore and the pursuit. (At least in the ways that I can, being who I am right now.)

Altogether then, I'm seeing that collective living, the intentional community impulse is in total harmony with transitioning into local resilience, and the Transition Town movement. They are interwoven for me, one fabric. Intertwined, they allow me, and anyone seeking that part of themselves, to seek and exploit my own resilient strengths.  

So now, what do I choose to make of this gift?


May 28, 2013

The Bathroom Palette on a Budget

I love it. When the palette and components all pull together. It delights both the designer and the project manager in me. There's a lovely, satisfied release seeing it all lock together and take on its own life!               

Normally I have the core idea, and get the base pieces. Then I let each piece inform the surrounding pieces once it's in place. 

That habit comes from years of doing the rehab work myself. Being on the site every day gives you the opportunity to see pieces "in situ." That tells you a lot about the direction the rest must go. For example, I added a sandblasted art glass window to a dressing room, after I placed the built-in dressing table. I could just see how sandblasting the only window offered the needed privacy while letting natural light shine into the space. (And I got to design a unique window as well.) I like the feel of layering and growing the design theme in response to what's there.

Loni cutting the window resist
But my contractor Tim asked that I get everything chosen, bought, and delivered before he began any work. You know, essentially making all the design decisions at once. It makes sense of course, but it can be daunting.

If you're buying online as well as at local stores, purchasing several items at once gets you free shipping - no small chunk of change when items like tubs are involved. But that means you have to visualize how the vanity light fixture in brushed nickel will look with the tub doors that you've only seen as online "pictures". What's the scale of the design element? How does the polished "this" really look with the brushed "that"? Trust your sensibilities. Play! It does pull together and it is enjoyable to do. There's a total "Yes!" when it arrives, you lay it all out, and see how the materials and textures interplay.

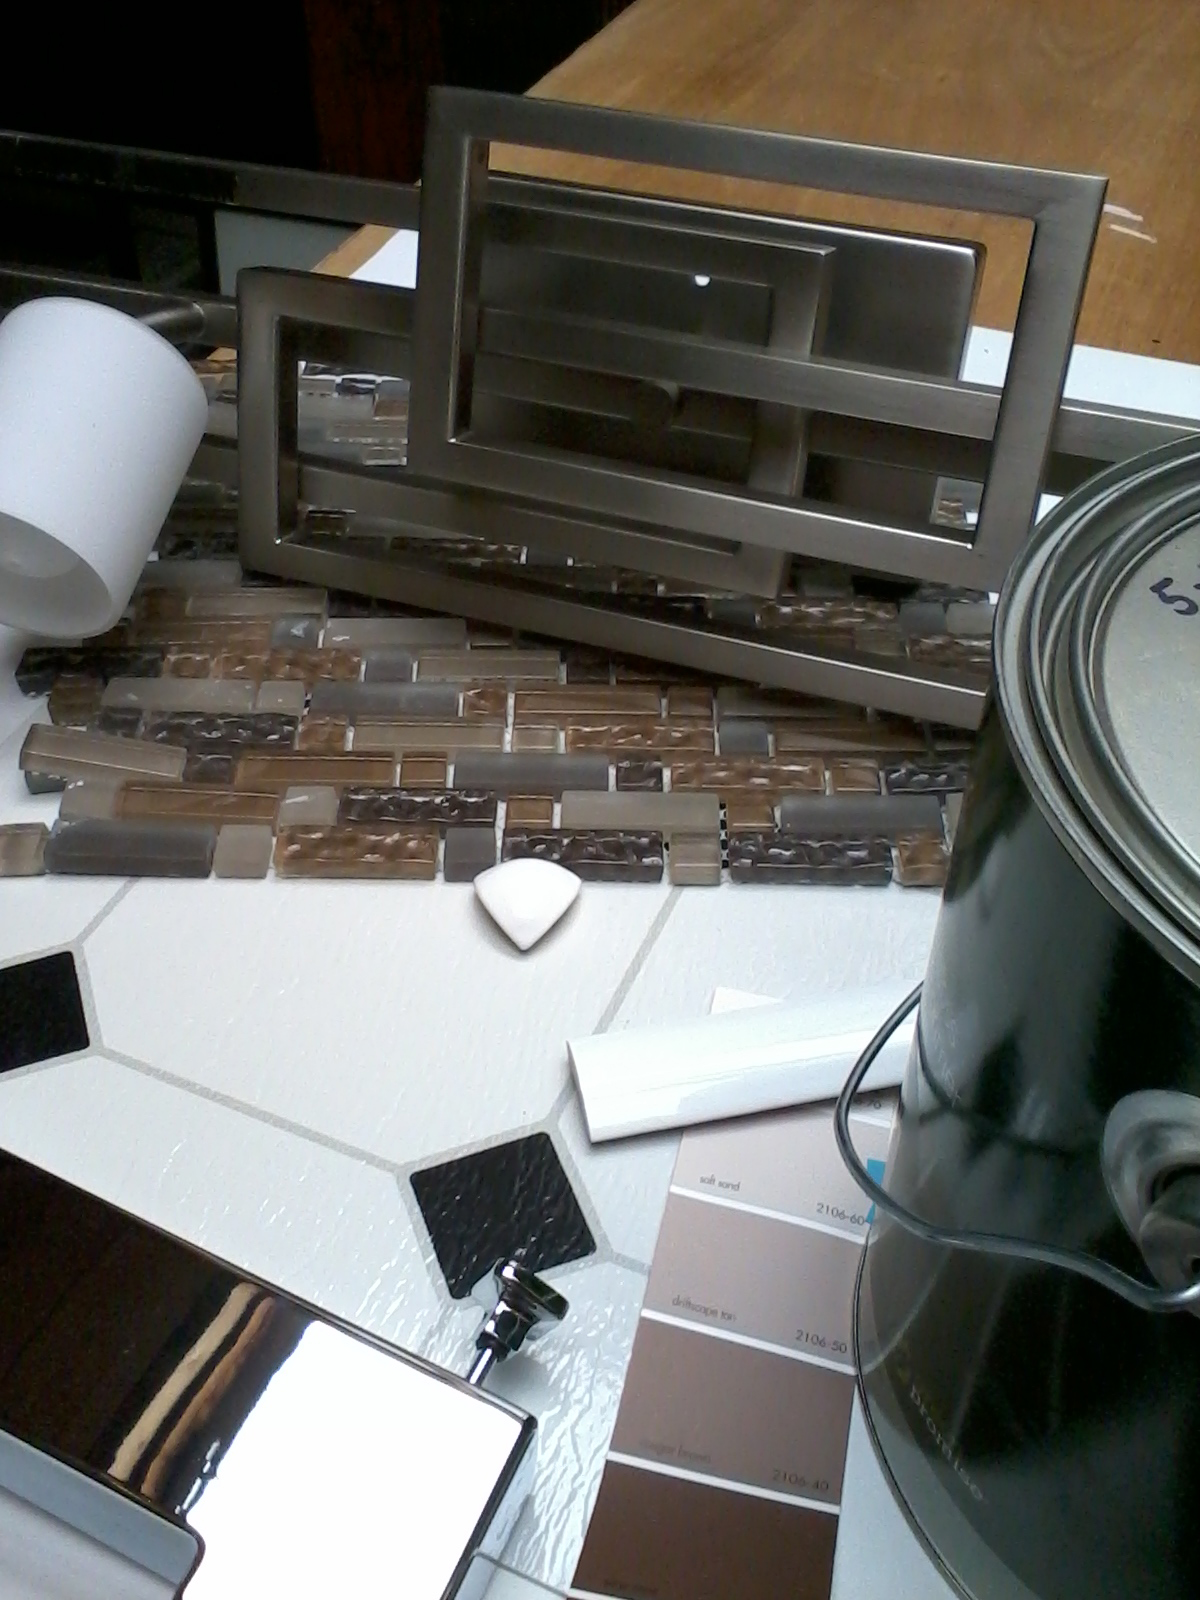
In our new bath, the Designer me was inspired by one piece: the sandblasted Cavata tub doors by Kohler you see below. It created the whole textural palette that runs through the elements of the bath. 

Kohler Cavata sandblasted door
Once I found these doors with the light cross-hatched pattern, everything I added in some way incorporated that texture. Sandblasting expanded into frosted tile, and also became brushed nickel metallics. Then, as I found the next pieces, their shape, material or texture added additional conventions to the look. Now it was squared and frosted, brushed metal,etc. 

The challenge of course is to make it all hang together without looking like those women's jewelry sets of the 50's. You know, the identically matching earrings, necklace and bracelet numbers? So while all the metal is very square in feel, I'm mixing the polished chrome you see in the elegant tub spout in the top picture and bright square vanity hardware, with brushed nickel pieces to make the feel modern, more eclectic, and more visually engaging.

And yesterday, I bought the paint for the master bath, hallway and new alcove. (On sale, of course!) You can see the two colors I'm using in the bath tucked under the paint can, just below the white edge tile. That was a lovely, focused day carefully looking at tones, and undertones, grouping pieces to see their impact on each other. My goal was finding a palette that was subtle yet rich enough to catch some of the lively brown tile, but not too vintage that it would gray out the floor's white. See how the sandalwood tones just pull at the yummy "city lights" tile palette? And that mix really glows against the creamy white field tile. In a room without natural light....that's exactly what I need.

The brushed nickel multi-rectangular element is my vanity light fixture.Terrific yes? It has sandblasted lights that pick up the cross-hatched sandblasted pattern of my tub doors and the frosted  "city lights" tiles. So that finishes out everything needed for my Phase 2 redesign.

Remember that this design work was done on a slim, slim budget. Understanding that good design works deeply around one idea, you can let a single piece inspire and be your focus. Then as you judiciously buy what surrounds it, you can let go of other ideas (as I've mentioned in earlier posts here and here ) Concentrating that focus can be powerful. Or use good, budget-wise pieces to broaden the design conversation, as I did. Just make sure it's only one conversation!


May 12, 2013

Phase I: Lessons in Sustainable Space Planning


I still have four or so posts to create  - and all their attendant visuals - to finish sharing our Phase I changes with you. But I have been thinking about what's happened thus far, and since we're beginning the rip-out for Phase 2, I can't help but assess and reflect.

If you've been reading Shelter&, you know that I purposefully gave Phase I a slim budget. For several reasons: 
  • For me, the most exploratory purpose

May 4, 2013

A Date with My Demo Man

TJ is getting into this full bore.

We've got just over two weeks until our contractor starts, and TJ has taken it upon himself to organize and do the entire new master bath rip out. We are going down to studs in what was the old laundry room. 
Door that leads to kitchen.


Wall that will have tub.


May 2, 2013

Phase I - KITCHEN #4 - The Extra Fridge

So along with all this rearranging in our kitchen, I did an experiment with my fridge. Originally back in December, I decided to buy a housemate fridge. That meant finding a place for it. I decided that if I bought one just a bit smaller, it would fit into the fridge alcove. But then our fridge needed to move. Where? I wanted to try next to the dishwasher. To see how that would feel, TJ, Rae and I moved our fridge over right after we did the chimney  (Part #1 in this series), and created the new work stations (Part #2). Could we get used to the fridge right there, or would it feel in the way?

To our surprise, it felt terrific!

For years we had moved around the island as shown to the left to prepare a meal. We got our food from the fridge, dumping the fixings on the small side of the island that was most reachable. Then we carried it all to the sink to clean, to then carry it to the other small side of the island to chop and throw into pots, or walked all the way to the far corner of the kitchen to pop things into the microwave. Because our micro is also a convection oven, we use it a great deal, cooking rice, and steaming veggies.
                                                                                                                             But as you see here, meal prep now lives in two tighter triangles on one side of the island. When we open our fridge, we place the washables immediately on the sink counter. Turn around and we're right where we need to cook. The microwave is closer to the prep areas too. And when our housemates are prepping food at their new stations, we're not in their way.


 So we kept the new position for our fridge, and purchased a new fridge for our housemates that just fit into the existing alcove you see in the plan below:


And there's more. Here's a sneak peak into Phase 2.

As you see here, I've noted a new, decently-sized alcove where the housemate fridge will ultimately go when we finish Phase 2 (Click to get a slide show of all pictures.) Creating that new space - and buying a fridge that opens in the proper direction- allows their fridge to open right onto the edge of the purple area where they prepare food.


It's not ideal since our housemates must move into the rose colored area when they need to wash or cook. If I had the budget, I'd put a second sink into the new counter by the chimney. (Maybe that will be a Phase 3 in future.) Doing that would create circulation triangles on each side of the island.

For now, it's working.

I love how piles of chopped fresh food fill the butcher blocks. Being vegetarian, Stephen likes to use the main island area to cut up his many assorted veggies. Then he grabs a bunch with both hands, reaches straight across to drop them into the hot pan on the stovetop. It sizzles.


We all take turns at the sink, cooktop or microwave, chattering about our day.


May 1, 2013

Phase I: KITCHEN #3 - The Serendipitous Delightful Palette

Here are the earlier posts about my kitchen rethinking. Each link opens in a new window so you can pop back here to continue the series:
Phase I: KITCHEN #1 - A Touch of Story

My Country For A Palette

No natural light reaches my kitchen without traveling through another room first. Windows are too far away. So one of the prior owners painted the kitchen all white. It's an honest impulse being the lightest tint. The floors are white, the walls are white, as are the counter surfaces, all the base and upper cabinetry, and the pantry doors. Everything, save some wood trim on counter edges, drawer and cabinet door fronts,....is white. But even with that touch of wood, the kitchen feels bland. Literally colorless. 

When we moved in, I wanted to add some color, something rich. And not wanting the typical kitchen-y yellow or green, I aimed for a bolder terracotta. It would give a nice groundedness to the bottom of the room, and the white uppers and counters would still add a brightness.

But the paint job came out a peachy orange. It wasn't horrible, but I wasn't thrilled. I'm still not.
I live with it, assuming that when I finally remodel this kitchen to make it flow better (Vortex Kitchen, remember?), I'll do something classy.

So the time has come. And my first thoughts in bringing our house story in here is this wonderful vintage palette below, with lots of sepia in it. Very Victorian. Done judiciously, I think that color fits into the modern, yet old world flavor palette I'm aiming at. (See Old Lady Furniture about that story.)

Phase I's Reality

As we are moving through our Phase I, the reality of designing this house for a wider and more collective use is making me selective. Selective about physical things, which is all to the good. But also about ideas. I am loosening my hold on "designing", per se. By that I mean, overlaying a design onto a space, even a good design. I have worried some that it would feel unfinished if I did less than a full-blown design story throughout. But instead I am discovering the reverse. Hidden inside this letting go, there is serendipity! There is more reusing things in fresh ways. And even better, there is rediscovering my delight. And that assembles into a more authentic, unique story. Ours!

So, I told you in Step 2  that I finished my second work station by throwing down a small area rug to invite housemates to use the area. Where did that come from? 

A room where it didn't work. Last year, I painted the kids upstairs bathroom an amazing apple green. Later, I happened upon a vibrant striped rug while shopping, and bought it, hoping it would work in the bathroom. But the bathroom is long and has a two-sink vanity. The rug looked too inconsequential. 

I held onto it because the palette pleased me.(I told myself that I didn't have anything else to use there for the moment.) So I just left it in there as the shower rug. And not using that bathroom, I totally forgot about it.

Well, look what happened! Somewhere inside me, this palette was meant to be a part of my house story. When my daughter Rae and I went shopping for the Common areas odds and ends last November, we bought placemats for the new harvest table, soap dishes, a shower caddy, small bathroom accessories and new dishtowels. (Ah, there's something about dishtowels.They're always grabbed when the potholder isn't within reach, or whenever you need something between you and whatever. They're constantly rubbed on wet hands and across kitchen surfaces too. I'm afraid mine quickly slip into raggedness without my noticing. ....and I still will use them. I won't embarrass mine with a picture.)

When I was buying placemats, I was looking at vintage greens and soft colors for the dining room. Understated.The soap dispensers for the kitchen were the bisque white and oiled brass that would work with the country style. But this is the dishtowel pack I picked....even as I clung to the vintage green kitchen in my future:
It was over a week before I realized how the rug and the towels worked together:


Now I am pleased with my peachy base cabinets.They will stay. They say playful in a very "me" way to my housemates. This is so much more organic than an imposed design theme. It grew from what I had obviously been drawn too, while it saved me dollars.

And now here's the last bit of serendipity. Do you remember the post ,Hinting at Story, Hinting at Period where I express how much I adore the Florida Cracker House palettes? They're colorful, bold and playful. Well, here it is! Rather than the subdued,Victorian kitchen that would "tell the proper story", I have a bright upbeat Cracker House kitchen.


I realize now that  instead of "what's my house's design story?", I should be asking "What delights me?" This cheery palette does and it works. Brightens my spirits in a way that even a very classy Vintage would not.

Now I have two housemates. Instead of gathering around the big country table as I first assumed, we all lean in places around the kitchen, with our bowls and cups in our hands, and we talk. Does my Cracker-colored kitchen contribute to that? If it was more vintage would the darker, formal feeling move us on our way ? Dunno. But I think the cheery me in this kitchen attracts them, and I'll take community where it comes. In this case, I believe it is organically designed into the room.

April 28, 2013

Phase I: The KITCHEN #2 - How Intending Multi-Use Improved What We Had Grown Accustomed To

So when I was figuring out what to do with my kitchen in the wee hours last December (See that post in a new window here), I realized that I could use the badly placed center island to advantage ( No, really?), and separate the multiple work areas of my "Vortex Kitchen."


(Whenever I discuss space planning, I'll always show you where that room lies in relationship to the rest of that floor. It's wise to keep the bigger picture - called  thinking about adjacencies- in mind as you rework a room so you understand where people will enter from or will want to travel to. )

Step #2 Planning for Multiple Meal Prep 

So here's a large room plan showing how my kitchen originally laid out:


  .

In this BEFORE picture to the right of the fridge and hallway wall, you see there was absolutely nothing on the wall. (I'll tell you that the kitchen's heating vent is in the center of the floor right there.)

Granted, I must have access to and take  into account anything over the heat, but still! Wasting four feet of floor space and an entire wall with nary a shelf in any kitchen is unforgivable. This is an overt example of wasted  or unused square footage. we have them all over our house, but really don't see them. When you want to modify your home for the better, or find places for new uses, finding these precious unused inches, and feet, should be one of the first things you look for as you walk around your house.

It doesn't take much to make big changes:
As you saw in my Kitchen Step #1 post about what I actually did,( "A Touch that Spoke of Story".), I added the chimney and the cabinetry on that wall. 

So now I added the narrow butcher block counter. It's the logical completion to a new cook prep station. With an inexpensive heat flow director ($5), and a careful choice about what counter works there - notice the raised open grid shelf for recycling below - I have created a comfortable place for another person in the kitchen, without heating anything I might worry about. Plus, it's right by their shelving! 
No push out or big remodel.

In phase 2, I'm wiring in an under cabinet light. I added two GFCI appliance outlets now, so anyone can plug in that 2-unit electric cook unit  tucked into the corner of the counter that I decided I'd use instead of another drop-in range. Less costly, way more flexible.


Now notice in my  plan above how my 13.3 cubic ft medium fridge does not fit into the alcove made for it. It's wider by maybe an inch or so. Painfully close. So it sits forward of the alcove. The fridge door doesn't open fully to remove the bins for cleaning, and it creates a bottleneck whenever we move anything from the great room beyond the glass sliders next to the dishwasher into the kitchen - moving the piano from the great room to the living room was no fun! But we've managed. It has been there for so many years that I don't think about it anymore.

But that's the point. See here where I've put things in the kitchen years ago and have used them this way ever since.

When I decided that I wanted more people sharing my kitchen, I realized that I had positioned our appliances to serve only two cooks. Us. Even though this kitchen is large enough for more many cooks and helpers.

More importantly, just thinking about the new intention allowed me to see places that were natural as new work stations. Places I didn't see before. It is easy now to move things out of the area and rethink the shelf contents for what people would need as they work there. I put the measuring tools on that low shelf and the drawers right there have prep utensils. Plus, the small appliances are now tucked into the dark corner that's least likely to be used for work, out of the way but still within easy reach.

In the last picture below, you see how I moved the microwave over, and put the breadmaker we only occasionally use in the Hoosier in the dining room. It can be brought out and plugged in wherever it's needed by whomever is baking. Flexible and responsive.

Last thing - I threw an area rug down in front of this new space - an invitation - and moved one of the butch block cutting boards over. Voila, another work area- and it already has under counter lighting!

The intention you bring to the room, even subconsciously, gives you that end result! So the more you decide the use, the more you'll get exactly that.


 So now my kitchen looks like this plan:

April 22, 2013

Phase I: The KITCHEN #1 - a Touch that Spoke of Story

So what actually happened in our kitchen? I altered only three things actually. 

First, I created a focal point, which I'll talk about in this post. Then I did the major rethinking to space plan for multiple users- so important if you are sharing a room. Lastly, I didn't paint!  Instead, I accidentally but happily found a palette that worked with the original cabinet color. Saved the dollars, and felt okay about the "not-quite-terra-cotta" orange lower cabinetry. But I will talk about that later.


Here's where the kitchen lives on our first floor. Notice there are rooms all around it, so no windows offer direct natural light into this continually-used home workspace.

Step #1 Tie the Modern Kitchen to the Story

First change I did was to give my kitchen a story focal point, just as I had in the dining room with my harvest table. In the BEFORE pictures below, you see a nondescript modern, and anything but 1908 kitchen. 


Since my story is Modern Farmhouse, I could leave most of it, but how to bring in one element that expressed the country aspect?


It was an inexpensive change, one I've wanted to do since I moved here. I recreated the existing chimney! 

What?


Do you see  the chimney here in the BEFORE shot of the pantry, fridge wall? It's that drywall covered column against the pantry doors. I know it's our chimney because you can see the other part of the chimney chase on the other side in the old laundry that is through the door. (You can also see the black dot marking the chimney chase on the plan above.

But could I just uncover it? Was that chase now a metal column or the original brick?  I hear water running inside the chase from an upstairs bathroom, but didn't know where the pipe was located - kitchen side, laundry side, inside or in front of? 

In the end, not knowing what I would find and not wanting to spend money filling in the gap that removing the wall would create in the flooring I was going to keep, I decided to recreate the chimney with thinly sliced, real brick (called Slim or Thin brick these days). I researched the many, many brick colors and then TJ and I picked one that went with the California Western Victorian period, that we also liked. (Remember, make the house story one you love.)

Here's how it happened:  
 
The wall came off, and yes, the 18" x 18" brick chimney is indeed there. You can see the original stove pipe hole too. Also, there are pipes running up the right side. If I'd hoped to use the original chimney, I'd be dealing with that plus the 4" gap in both my subfloor and finish floor. Building on top of what was there was the right choice.  

The archeologist in me immediately imagined the original design. Was the cook stove against the wall right here, or sticking out into the heart of the room? The bricks are widely, coarsely spaced with messy mortar between, and that's true-sized timber framing around it, so my guess is that it was covered up originally. The chimney was utilitarian not meant to be seen. Heh, well now my house will have an exposed chimney!


Cement board establishes the original profile and a hearty chimney size, giving us a strong surface onto which we can adhere the brick.

Authentic materials offer wonderful texture to our very digital world. Our homes are the perfect place to have materials we want to touch. That feel like hearth and home literally. This thinly molded brick is real brick, but it is 1/2" thick and comes with corners and flats. Looks substantial, but at one fifth the weight.


 Finally, mortared and washed, here's my new original chimney, below.  


My contractor wanted to put the matching upper cabinet I made for this wall up first and then brick around it, so it was all tied together.

                                                 But instead, I insisted that he build the full chimney first, then mount the cabinet right up against the brick, so it looked like the chimney came first, long ago, and had always been there. Then the cabinet was added later onto it.


 To add some fun and bit more back in time feel, I also had Tim bury an hand-hewn railroad nail in a course of mortar, high enough to hang some period or playful piece.  Ideas and images for what might fit are welcome!
I am pleased that I was able to bring the house story into my kitchen with one piece, but I was careful to do it with real materials and textures. I didn't play at "old." I used authentic finishes to recreate it.
 
(To see a slideshow of these pictures, click on any picture in the post.)